Showing posts with label opnet modeler. Show all posts
Showing posts with label opnet modeler. Show all posts
Wednesday, September 26, 2012

Opnet INSTALLATION, OPNET 14.5 Configuration
This is my first blog post. Hope it will be interesting to you. I am going to start with network simulator tool OPNET14.5.
So, What is OPNET14.5 ????
OPNET is a network modeler through which one can design any kind of network model and then can simulate it. 14.5 is the version of OPNET and it is freeware.
Here simulation means OPNET will generate the traffic as defined in attributes set by user and will generate results like utilization, collision, load, etc (these analysis parameters are again set defined by user. We will discuss later on how to define each attribute).
Now, first we will discuss about how to install and major part is how to configure the OPNET on MS VS2008.
INSTALLATION
OPNET 14.5 modeler have three packages. So install them in sequence as:
1. First install OPNET Modeler.
2. Second Install OPNET documentation.
3. Then last install OPNET library.
Also, note that every package is installed in same directory.
CONFIGURATION
Now, after installing one have to set environment variables. So, I think
first question will be why we need to set environment variables?? If we
don't do what will happen???
Well, I will answer you at the end of this discussion. :) :)
I am considering that MS VS2008 is installed in default directory
i.e.( C:\Program Files\Microsoft Visual Studio 9.0\ ). First right click
on 'My Computer' choose 'Advanced" tab and the click on
'Environment Variables'. Then in system variables add following
variables:
a) PATH
C:\Program Files\Microsoft Visual Studio 9.0\Common7\IDE;
C:\Program Files\Microsoft Visual Studio 9.0\VC\BIN;
C:\Program Files\Microsoft Visual Studio 9.0\Common7\Tools;
C:\Program Files\Microsoft Visual Studio 9.0\Common7\Tools\bin;
C:\WINDOWS\Microsoft.NET\Framework\v3.5;
C:\WINDOWS\Microsoft.NET\Framework\v2.0.50727;
C:\Program Files\Microsoft Visual Studio 9.0\VC\VCPackages;
C:\Program Files\Microsoft SDKs\Windows\v6.0A\bin;
b) LIB
C:\Program Files\Microsoft Visual Studio 9.0\VC\ATLMFC\LIB;
C:\Program Files\Microsoft Visual Studio 9.0\VC\LIB;
C:\Program Files\Microsoft SDKs\Windows\v6.0A\lib;
c) LIBPATH
C:\WINDOWS\Microsoft.NET\Framework\v3.5;
C:\WINDOWS\Microsoft.NET\Framework\v2.0.50727;
C:\Program Files\Microsoft Visual Studio 9.0\VC\ATLMFC\LIB;
C:\Program Files\Microsoft Visual Studio 9.0\VC\LIB;
d) INCLUDE
C:\Program Files\Microsoft Visual Studio 9.0\VC\ATLMFC\INCLUDE;
C:\Program Files\Microsoft Visual Studio 9.0\VC\INCLUDE;
C:\Program Files\Microsoft Visual Studio 9.0\SDK\v3.5\include;
e) NetSamplePath
C:\Program Files\Microsoft Visual Studio 9.0\SDK\v3.5;
f) DevEnvDir
C:\Program Files\Microsoft Visual Studio 9.0\Common7\IDE;
g) FrameworkDir
C:\Windows\Microsoft.NET\Framework;
h) FrameworkSDKDir
C:\Program Files\Microsoft Visual Studio 9.0\SDK\v3.5;
i) FrameworkVersion
v2.0.500727;
j) VCBUILD_DEFAULT_CFG
Debug^|Win32;
k) VCBUILD_DEFAULT_OPTIONS
/useenv;
l) VCINSTALLDIR
C:\Program Files\Microsoft Visual Studio 9.0\VC;
m) VSINSTALLDIR
C:\Program Files\Microsoft Visual Studio 9.0;
Oops!!!!! lot of variables...:) :)
Now I will answer the question raised at the starting of discussion Why it is required??
So we can design a network in two ways a) Using the Object Pallete and
b) Through coding... Obviously no one wants to do it though coding when
everything is graphically done by just setting attributes and code will
be generated for same. So whatever you are designing graphically , for
same a code will be generated in C that needed to be compiled before we
do simulation so all these variable we defined above will set the path
for all header files required for compilation and execution of the
network. That's why OPNET requires VS2008 because it uses VS2008 for
code compilation and execution. That's why we need to set
these environment variables. I think now you got answer of first
question that why we did that. Now if we don't do it then we can design
the network but cant simulate it.
I think if you go to manual of OPNET you will find the same variable but
if it is for VS2005 the directory names will be different for example
.Net framework used in VS2005 is v2.0 while in VS2008 it is v3.5 so you
need to make changes at all respective places.
Also if you get error during compilation that
gna_email_mgr.pr.tmp.c
c:\opnet\14.5.a\sys\include\vos.h(105) : fatal error C1083: Cannot open include file: 'WinDef.h': No such file or directory.
Then search the Windef.h in my computer. You will get lot of results but you have to select the path as:
C:\Program Files\Microsoft SDKs\Windows\v6.0A\Include;
Copy the address and append it to 'INCLUDE' environment variable value.
I think now we are done with configuration.
uuuhhhhh!!!!!! It seems that we have done a kind of project :) :) but
exactly speaking we have just set the environment for our projects :)
:).
Hope it gives you enough information to set OPNET 14.5 network modeler.
Follow this steps instead to configuration files
OPNET 14 installation guide.doc
Configuring OPNET 12.0 with .NET 2005 on Windows 64 XP Professional.doc
see and do
Opnet does not have a compiler. You have to install compilers like VC++ or visual studio 2005 or anyother version. Then you have to change the environment variable of your computer. It will be in properties of your MyComputer
On Windows NT:
Start -> Settings -> Control Panel -> System -> Environment
On Windows 2000 and Win XP:
Start -> Settings -> Control Panel -> System -> Advanced -> Environment Variables
Each time a variable is updated, you need to click the Set button for the changes to take effect. Once all of the changes have been made, click OK to close the dialog box.
Note that for some systems, the 8.3 format must be used in order to see proper behavior (e.g. "C:\PROGRA~1\MICROS~1\Common\Tools"). Note also that spaces should not be used immediately after the semicolon (";") character in the environment settings. for further help in setting system environment variables, contact your system administrator.
----------------------------------------------
THE FOLLOWING INSTRUCTIONS ARE FOR Windows NT, Windows 2000 and Win XP:
************* IMPORTANT NOTE *****************
For all of the environment variables below, do not put spaces between the directories.
There should be NO SPACE between the semicolon ";" and the drive letter of the next directory!
For example, the following is CORRECT:
C:\Program Files\Microsoft Visual Studio\Common\msdev98\BIN;C:\Program Files\Microsoft Visual Studio\VC98\BIN;
However, the following is INCORRECT:
C:\Program Files\Microsoft Visual Studio\Common\msdev98\BIN; C:\Program Files\Microsoft Visual Studio\VC98\BIN;
******************************
Add the following items to the PATH environment variable.
C:\Program Files\Microsoft Visual Studio\Common\msdev98\BIN;
C:\Program Files\Microsoft Visual Studio\VC98\BIN;
C:\Program Files\Microsoft Visual Studio\Common\TOOLS\WINNT;
C:\Program Files\Microsoft Visual Studio\Common\TOOLS;
Add the following items to the INCLUDE environment variable.
C:\Program Files\Microsoft Visual Studio\VC98\ATL\INCLUDE;
C:\Program Files\Microsoft Visual Studio\VC98\INCLUDE;
C:\Program Files\Microsoft Visual Studio\VC98\MFC\INCLUDE;
Add the following items to the LIB environment variable.
C:\Program Files\Microsoft Visual Studio\VC98\LIB;
C:\Program Files\Microsoft Visual Studio\VC98\MFC\LIB;
Add the following item to the MSDevDir environment variable.
C:\Program Files\Microsoft Visual Studio\Common\MSDev98
Note: These instructions assume MSVC was installed in the default location.
If MSVC was installed in a different location on your system you may need to
modify the paths specified above to match your installation.
TO VERIFY THAT THESE SETTINGS ARE CORRECT:
One quick way is to open a new OPNET Console (from the "Start" button, select "Program Files"->"OPNET Modeler" -> "OPNET Console") then type the following and examine the output of "path", "lib" and "include" environment variables.
prompt> set
Another way to check, is to type the following command:
prompt> cl
If it returns the following output:
Microsoft (R) 32-bit C/C++ Standard Compiler Version 12.00.8168 for 80x86
Copyright (C) Microsoft Corp 1984-1998. All rights reserved.
usage: cl [ option... ] filename... [ /link linkoption... ]
Then it means that MSVC++ is in your path.
Note: If the instructions in this FAQ do not appear to succeed, in certain very rare cases, it has been reported that the issues may be fixed by using tildes ('~') in the above paths to achieve 8.3 format such as:
C:\PROGRA~1\MICROS~1\Common\MSDev98
If you continue to experience issues, you may also wish to see the paths used by MS Visual C++ by examining the file:
C:\Program Files\Microsoft Visual Studio\VC98\BIN\VCVARS32.bat
Have a nice day
Network Designing and simulation using OPNET 14.5.
Hello,
So we are back on our discussion on OPNET 14.5 , how to design network and then simulate it...:)
I already talked about how to set the environment of OPNET to work on it in last post.
So, today we will be designing a small network and then we will move on to complex networks in later discussions.
Lets consider a simple office network of 10 workstations (clients) and 1 server connected through a hub.
First we have to design this network. Don't worry...... designing means we have to select respective objects and connect then...That's it and our network will be ready to work ... haha... :) Okay back to point and lets see how easy it is... :):)
Designing Network
Select 'New Project' and create a new project. In this project it will ask for a scenario create scenario_1 as example. So what is scenario???
Scenario is part of our complete network we want to simulate. Because we cant build and simulate whole network in one go, we divide network in areas, parts, domains, sub-nets, etc. called as scenarios.
So in scenario_1we will be designing the simple network.
1. Click on 'Open Object Palette'. We are creating a office network which is Ethernet based network so select 'ethernet' in 'Shared Object Palettes'.
2. We need 10 workstations . So select 'ethernet_wkstn' from 'Node Models', drag it in scenario workspace. Left click ten times (replicate the same object) and then do right click to stop duplicating objects. So we added 10 workstations to network.
3. Select 'ethernet_server' from same 'Object palette', drag it to workspace and right click as we don't need more than 1 server. Similarly drag 'ethernet16_hub' to workspace.
4. Now we need to connect all nodes. So, select '10baseT' links from 'Object Palette'. First click on hub and then click on node. Do same for all nodes to connect every node with hub and then right click to stop connecting.
5. To set configuration of network traffic we need two more objects 'Profile Config' and 'Application Config' so drag them in workspace.
So I think the network you designed may look like this:

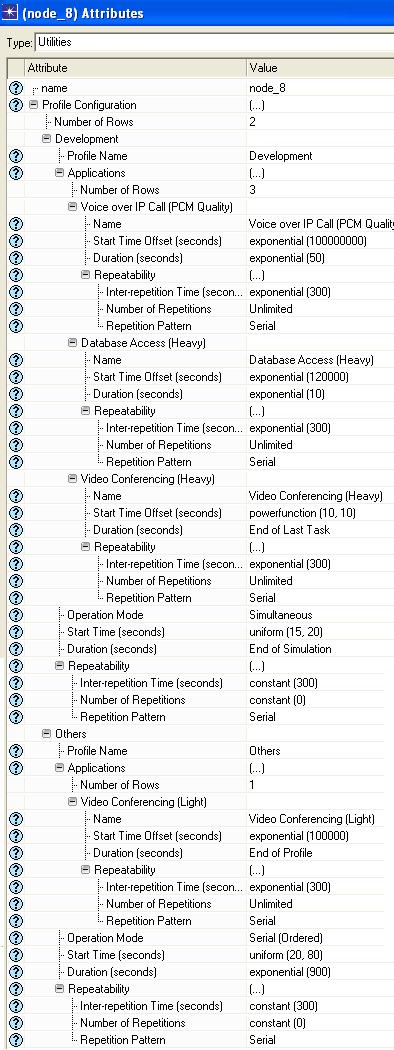
6. Now we need to set network traffic. So right click on Profile Config object and select 'Edit attributes' and then
So we are back on our discussion on OPNET 14.5 , how to design network and then simulate it...:)
I already talked about how to set the environment of OPNET to work on it in last post.
So, today we will be designing a small network and then we will move on to complex networks in later discussions.
Lets consider a simple office network of 10 workstations (clients) and 1 server connected through a hub.
First we have to design this network. Don't worry...... designing means we have to select respective objects and connect then...That's it and our network will be ready to work ... haha... :) Okay back to point and lets see how easy it is... :):)
Designing Network
Select 'New Project' and create a new project. In this project it will ask for a scenario create scenario_1 as example. So what is scenario???
Scenario is part of our complete network we want to simulate. Because we cant build and simulate whole network in one go, we divide network in areas, parts, domains, sub-nets, etc. called as scenarios.
So in scenario_1we will be designing the simple network.
1. Click on 'Open Object Palette'. We are creating a office network which is Ethernet based network so select 'ethernet' in 'Shared Object Palettes'.
2. We need 10 workstations . So select 'ethernet_wkstn' from 'Node Models', drag it in scenario workspace. Left click ten times (replicate the same object) and then do right click to stop duplicating objects. So we added 10 workstations to network.
3. Select 'ethernet_server' from same 'Object palette', drag it to workspace and right click as we don't need more than 1 server. Similarly drag 'ethernet16_hub' to workspace.
4. Now we need to connect all nodes. So, select '10baseT' links from 'Object Palette'. First click on hub and then click on node. Do same for all nodes to connect every node with hub and then right click to stop connecting.
5. To set configuration of network traffic we need two more objects 'Profile Config' and 'Application Config' so drag them in workspace.
So I think the network you designed may look like this:
6. Now we need to set network traffic. So right click on Profile Config object and select 'Edit attributes' and then
a) Select Number of Rows as 2.
b) Set the attributes as shown in pic (node_8 attributes).
7. Click 'OK'.
8. Select 'Application Config' Object and right click on it. Set Application Attributes to Default.
Till this point from configuration point of view we have set the network traffic but didn't set which node will generate what traffic.
9. So, Select all workstations, right click and select 'Edit Attributes'.
a) Select Application Supported Profiles.
b) Select 'Number of rows' as 2.
c) Set the parameters as shown in below:

d) After doing all this Check on 'Apply To Selected Objects'. Here I have set all clients as same traffic generator you can experiment with different traffic also.
10. Now you have to configure server so select server, right click, select 'Application Supported Services' and set it to 'ALL'.
11. Now everything is ready i.e. we have designed the network, defined all attributes of all objects.
Happy and ready to simulate it. Okay lets do simulation..
Ohhoohhooo!!!!....we have defined everything but we din't set, after simulation what we want to analyse...???? :) :)
Okay, lets quickly set the parameters we want to analyse and then ready set and go..............
Setting Analysis Parameters
1. Right click on workspace and select 'Choose Individual DES Statistics'.
2. In 'Global Statistics' select 'Ethernet->Delay(sec)'.
3. Similarly in Node Statistics Ethernet select parameters like Load, Utilization, Collision Count, etc whatever you want to analyse.
Okay so all set ....
Save the Project and then click on 'Configure/Run Discrete Event Simulation (DES)'. Set Simulation time to 20 minutes and click Run.
After simulation is over you can view results of all statistics you set. Statistics in form of graph I got look like this:

Hmmm......so finally designed and simulated a small office network using OPNET 14.5.
So for today, I think it is enough.
This was just an introduction of how to work on OPNET. In later discussions we will work on some big and complex networks and will try to figure out how different network fails, which equipment of which vendor are best for which network??? So lot of questions yet to answer....
Okay .Hope you enjoyed it..
Bbyyee..
b) Set the attributes as shown in pic (node_8 attributes).
7. Click 'OK'.
8. Select 'Application Config' Object and right click on it. Set Application Attributes to Default.
Till this point from configuration point of view we have set the network traffic but didn't set which node will generate what traffic.
9. So, Select all workstations, right click and select 'Edit Attributes'.
a) Select Application Supported Profiles.
b) Select 'Number of rows' as 2.
c) Set the parameters as shown in below:
d) After doing all this Check on 'Apply To Selected Objects'. Here I have set all clients as same traffic generator you can experiment with different traffic also.
10. Now you have to configure server so select server, right click, select 'Application Supported Services' and set it to 'ALL'.
11. Now everything is ready i.e. we have designed the network, defined all attributes of all objects.
Happy and ready to simulate it. Okay lets do simulation..
Ohhoohhooo!!!!....we have defined everything but we din't set, after simulation what we want to analyse...???? :) :)
Okay, lets quickly set the parameters we want to analyse and then ready set and go..............
Setting Analysis Parameters
1. Right click on workspace and select 'Choose Individual DES Statistics'.
2. In 'Global Statistics' select 'Ethernet->Delay(sec)'.
3. Similarly in Node Statistics Ethernet select parameters like Load, Utilization, Collision Count, etc whatever you want to analyse.
Okay so all set ....
Save the Project and then click on 'Configure/Run Discrete Event Simulation (DES)'. Set Simulation time to 20 minutes and click Run.
After simulation is over you can view results of all statistics you set. Statistics in form of graph I got look like this:
Hmmm......so finally designed and simulated a small office network using OPNET 14.5.
So for today, I think it is enough.
This was just an introduction of how to work on OPNET. In later discussions we will work on some big and complex networks and will try to figure out how different network fails, which equipment of which vendor are best for which network??? So lot of questions yet to answer....
Okay .Hope you enjoyed it..
Bbyyee..
how to Install Opnet version 14.0
Introduction
Source
- Files are in: \\storage1\cecn_admin\src\opnet\v14\wireless
Installation
- Run Visual Studio 2005 first before installing.
- Install Order
Install OPNET 14 (ignore the warning about the environment not being setup properly)
- modeler_140A_PL3_6313_win.exe -f license_server.properties
- models_140A_PL3_17Oct07_win.exe -i silent
- modeler_docs_140A_PL2_24-Sep-2007_win.exe -i silent
License
olio.coe.ad.mtu.edu port_a
Configuration
- run opnetvariables.vbs ONCE to set all the opnet system environment variables needed to work with VS 2005
- it must be run from cscrīpt
- Cscrīpt //h:cscrīpt //nologo //s
- copy files:
- copy c:\program files\opnet\14.0.A\sys\pc_intel_win32\bin\manifest\* c:\program files\opnet\14.0.A\sys\pc_intel_win32\bin
OPNET FAQ
- Question: What are the proper system environment settings for Microsoft's Visual Studio .NET 2005 compiler to work the 12.0 release of OPNET?
- Answer: As of 12.0 PL0,OPNET supports Microsoft Visual Studio .NET (2005 version).
- Note:Please refer to FAQ 1219 for .NET 2003 and FAQ 783 for .NET 2002 settings.
- Note that you must ensure your system environment is set up correctly. Here is the list of environment settings that should be added or set in the System Variables on your computer.
- (Note: If the variable name already exists, make sure that the value associated for that variable exists. If not, you must add the below value to the variable. Consult your System Administrator or Microsoft technical support for assistance. This FAQ is provided as a courtesy only.)
- NOTE: The following settings assume that Visual Studio .NET (2005 version) has been installed using the default installation directory settings and that your SystemRoot variable is set to C:\WINNT. If these are not the settings you have, then you must adjust the following settings accordingly.
My Computer-> advanced-> environment variable-> system environment variables
Variable 1: Path
Value:
C:\Program Files\Microsoft Visual Studio 8\Common7\IDE;
C:\Program Files\Microsoft Visual Studio 8\VC\BIN;
C:\Program Files\Microsoft Visual Studio 8\Common7\Tools;
C:\Program Files\Microsoft Visual Studio 8\Common7\Tools\bin;
C:\Program Files\Microsoft Visual Studio 8\VC\PlatformSDK\bin;
C:\Program Files\Microsoft Visual Studio 8\SDK\v2.0\bin;
C:\WINNT\Microsoft.NET\Framework\v2.0.50727;
C:\Program Files\Microsoft Visual Studio 8\VC\VCPackages;
C:\Program Files\Microsoft Visual Studio 8\SDK\v2.0\Bin;
C:\WINNT\Microsoft.NET\Framework\v2.0.50727;
C:\Program Files\Microsoft Visual Studio 8\VC\bin;
C:\Program Files\Microsoft Visual Studio 8\Common7\IDE;
C:\Program Files\Microsoft Visual Studio 8\VC\vcpackages;
Variable 2 : INCLUDE
Value:
C:\Program Files\Microsoft Visual Studio 8\VC\ATLMFC\INCLUDE;
C:\Program Files\Microsoft Visual Studio 8\VC\INCLUDE;
C:\Program Files\Microsoft Visual Studio 8\VC\PlatformSDK\include;
C:\Program Files\Microsoft Visual Studio 8\SDK\v2.0\include;
Variable 3: LIB
Value:
C:\Program Files\Microsoft Visual Studio 8\VC\ATLMFC\LIB;
C:\Program Files\Microsoft Visual Studio 8\VC\LIB;
C:\Program Files\Microsoft Visual Studio 8\VC\PlatformSDK\lib;
C:\Program Files\Microsoft Visual Studio 8\SDK\v2.0\lib;
Variable 4: LIBPATH
Value:
C:\WINNT\Microsoft.NET\Framework\v2.0.50727;
C:\Program Files\Microsoft Visual Studio 8\VC\ATLMFC\LIB;
Variable 5: NetSamplePath
Value: C:\Program Files\Microsoft Visual Studio 8\SDK\v2.0;
Variable 6: DevEnvDir
Value: C:\Program Files\Microsoft Visual Studio 8\Common7\IDE;
Variable 7: FrameworkDir
Value: C:\WINNT\Microsoft.NET\Framework;
Variable 8: FrameworkSDKDir
Value: C:\Program Files\Microsoft Visual Studio 8\SDK\v2.0;
Variable 9: FrameworkVersion
Value: v2.0.50727;
variable 10: VCBUILD_DEFAULT_CFG
value: Debug^|Win32;
Variable 11: VCBUILD_DEFAULT_OPTIONS
Value: /useenv;
Variable 12: VCINSTALLDIR
Value: C:\Program Files\Microsoft Visual Studio 8\VC;
Variable 13: VSINSTALLDIR
Value: C:\Program Files\Microsoft Visual Studio 8;
- To ensure that the .NET product is installed correctly, open a Command Prompt and type "cl" to invoke the compiler. Then type "link" to invoke the linker/binder. Confirm that each of these commands returns the correct information for the .NET installation.
opening
'cmd' at Run, and trying the command-line compiler and linker with the
commands 'cl' and 'link' respectively. If the environment is configured
correctly, you should NOT get a "Bad command or filename" and the
commands should execute.
- =============
- If you are using .NET 2005 on WinXP, then you will need to follow this additional step:
- =============
- After you have configrued your environment as listed above, open Windows Explorer and copy files from your \sys\pc_intel_win32\bin\manifest to \sys\pc_intel_win32\bin.
- If you are using .NET 2005 on a 64-bit machine, you will need to copy the corresponding manifest files from \sys\pc_amd_win64\bin\manifest to \sys\pc_amd_win64\bin.
- After this, you can start modeler and run simulations as usual.
- Note: There is a contributed paper with detailed steps and screenhots to help you set up this environment easily.
- https://enterprise16.opnet.com/4dcgi/Biblio_FullAbstract?BiblioID=1097
- Title: Configuring OPNET 12.0 with .NET 2005 on Windows 64 XP Professional
Retrieved from "https://secure.cecn.mtu.edu/cecndocs/index.php/InstallingOpnetv14"
OPNET Frequently Asked Questions
Note: The problem with missing/deleted files has been resolved. Remember that when you modify built-in models, you must save them with a new file name.
- 0.0 Where do I begin?
- 1.0 How do I set-up OPNET?
- 1.1 Log into a graduate workstation.
- 1.2 Parameter set-up for initial use.
- 1.3 Starting OPNET.
- 1.1 Log into a graduate workstation.
- 2.0 What is our MIL 3 Group ID?
- 3.0 What is the MIL 3 MUC?
- 3.1 Product Logged Problem Reports
- 3.2 Mailing lists (Moderated by Mil3)
- 3.3 Accessing the MUC
- 3.1 Product Logged Problem Reports
- 4.0 Where can I find models developed by customers?
- 4.1 Local subdir
- 4.2 FTP site
- 4.1 Local subdir
- 5.0 Is there a listing of the OPNET functions/procedures?
- 6.0 In the online documentation, how do I know what's hyper-text (i.e. clickable) and what's not?
- 7.0 Is the online index "searchable?"
- 8.0 What is EMA code?
- 9.0 Are there different simulation modes available?
- 10.0 So, what does the "rehash" button rehash?
- 11.0 Where is the trouble shooting chapter and what problems does it address?
- 12.0 Can I use a shell scrīpt to run a simulation?
- 13.0 What are the OPNET programs and scrīpts and where are they documented?
- 14.0 I am ready to begin designing at the process model level, where should I start?
- 15.0 How do I trouble-shoot process model compile-time errors and simulation run-time errors?
- 16.0 What's the difference between State Variables and Temporary Variables?
- Edit your .cshrc file. Replace every occurrence of "3.0.A_DL5" with "3.0.B_DL0".
- type source .cshrc
- Make a copy of your env_db3.0 file, located in your local op_admin sub-directory. The new filename should include the release info, for example env_db3.0.A_DL5.
- Run op_newuser again. (Follow the instructions just as before in the "How do I set-up OPNET?" section.)
- "Recompile all user-developed or modified process models, transceiver pipeline stages, and external C files."
- Read through the new "Where do I begin?" section.
• 0.0 Where do I begin?
Begin Here! This is not necessarily a quick-reference because there are no shortcuts to learning to use OPNET:-( This is, however, an attempt to provide a methodological approach to learning to use the tool.
Begin Here! This is not necessarily a quick-reference because there are no shortcuts to learning to use OPNET:-( This is, however, an attempt to provide a methodological approach to learning to use the tool.
- Follow the set-up steps in the "How do I set-up OPNET?" section.
- Read the Preference and Introduction to the Tutorial Manual.
- Read the outside, back cover of the one of the manuals to see what is contained in each of the manuals.
- Quickly read through this FAQ at a high-level. (You will notice that this FAQ is just an unordered compilation of some of the questions and answers that I have encountered.)
- If you will use built-in models, minimally you should do the M/M/1 Queue and Packet Switch Chapters of the Tutorial Manual. If the behavīor that you are planning to simulate is not built-in, you should also do the Basic Process Model Chapter. Ideally, you should do the tutorials in order, up to and including the CSMA/CD Chapter. If you are researching wireless communications, you should do the Mobile Radio Chapter too.
- Read through this FAQ again, this time, paying a little closer attention to details.
- Begin your modelling journey...
Brief hints for all users:
- Use all capital letters in the filenames when you save models. It makes the models easier to distinguish between your models and the built in models.
- Technical Support is usually responsive. When you email them (at opnet@mil3.com), you should include our Group ID, which is: 9720. Click on the "About OPNET" icon, which is located in the lower right corner of the OPNET window (M3UI), to learn about the type of support they provide.
- The index (Volume 12) for the documentation is very thorough. Use it.
Brief hints for ATM users:
- ATM models are described in the ATM Chapter of the Models/Protocols Manual.
- There two ATM network models built-in: a client-server network and an enterprise network. You can also build your own networks.
• 1.2.1 For Suns
- Enter the following or add to your .cshrc file:
setenv LD_LIBRARY_PATH /usr/openwin/lib:/usr3/local/lib:/usr/lib
set path=($path /usr21/opnet/3.0.B_DL0/sys/sun_sparc_solaris/bin)
setenv LD_LIBRARY_PATH ${LD_LIBRARY_PATH}:/usr21/opnet/3.0.B_DL0/sys/sun_sparc_solaris/lib
You might need to add the following line to your .cshrc if you get a "LD_LIBRARY_PATH undefined" error.
setenv LD_LIBRARY_PATH /usr/openwin/lib:/usr3/local/lib:/usr/lib
- Enter op_newuser and answer the questions as indicated below.
-- MIL3 dir > /usr21/opnet
-- Include all models > y
-- Default OPNET product for this user account > 2
[for OPNET Modeler/Radio]
-- font configuration > 1
-- display name > [simply hit enter here]
- Add the following line to your env_db3.0 file contained in your <$HOME>/op_admin/ directory.
arch_suffix: TRUE
(Note: This attribute setting forces all Sun Solaris architecture-specific files to embed "*.s1.*" in the generated file's name. Also, this setting forces all HP-UX architecture-specific files to embed "*.h0.*" in the generated file's name.)
- If your are not already logged into "ash", then telnet to it now. This is the only Sun workstation that you will be able to use.
- Finally, you should go to the systems administrator to get write permission to the OPNET models sub-directory. Also, request to be added to the OPNET group.
- Enter the following or add to your .cshrc file:
setenv LD_LIBRARY_PATH /usr/openwin/lib:/usr3/local/lib:/usr/lib
set path=($path /usr21/opnet/3.0.B_DL0/sys/sun_sparc_solaris/bin)
setenv LD_LIBRARY_PATH ${LD_LIBRARY_PATH}:/usr21/opnet/3.0.B_DL0/sys/sun_sparc_solaris/lib
You might need to add the following line to your .cshrc if you get a "LD_LIBRARY_PATH undefined" error.
setenv LD_LIBRARY_PATH /usr/openwin/lib:/usr3/local/lib:/usr/lib
- Enter op_newuser and answer the questions as indicated below.
-- MIL3 dir > /usr21/opnet
-- Include all models > y
-- Default OPNET product for this user account > 2
[for OPNET Modeler/Radio]
-- font configuration > 1
-- display name > [simply hit enter here]
- Add the following line to your env_db3.0 file contained in your <$HOME>/op_admin/ directory.
arch_suffix: TRUE
(Note: This attribute setting forces all Sun Solaris architecture-specific files to embed "*.s1.*" in the generated file's name. Also, this setting forces all HP-UX architecture-specific files to embed "*.h0.*" in the generated file's name.)
- If your are not already logged into "ash", then telnet to it now. This is the only Sun workstation that you will be able to use.
- Finally, you should go to the systems administrator to get write permission to the OPNET models sub-directory. Also, request to be added to the OPNET group.
• 1.2.2 For HPs
- Enter the following or add to your .cshrc file:
set path=($path /usr21/opnet/3.0.B_DL0/sys/hp_pa_hpux/bin)
setenv SHLIB_PATH ${SHLIB_PATH}:/usr21/opnet/3.0.B_DL0/sys/hp_pa_hpux/lib:/usr/local/X11R5/lib
You might need to add the following line to your .cshrc if you get a "SHLIB_PATH undefined" error.
setenv SHLIB_PATH /usr/local/X11R5/lib
- Enter op_newuser and answer the questions as indicated below.
-- MIL3 dir > /usr21/opnet
-- Include all models > y
-- Default OPNET product for this user account > 2
[for OPNET Modeler/Radio]
-- font configuration > 3
[for HP 9000/7xx Display, HP VUE Environment]
-- display name > [simply hit enter here]
- If you want to use HPs only, then skip down to 1.3, otherwise continue to the next line.
- If you want the flexibility to use either the HP or Sun architecture, then you must add the following line to your env_db3.0 file. You will need to run op_newuser only once.
arch_suffix: TRUE
- This added flexibility also restricts you to using either "ash" or "sheep."
- Finally, you should go to the systems administrators to get write permission to the OPNET models sub-directory. Also, request to be added to the OPNET group.
- Enter the following or add to your .cshrc file:
set path=($path /usr21/opnet/3.0.B_DL0/sys/hp_pa_hpux/bin)
setenv SHLIB_PATH ${SHLIB_PATH}:/usr21/opnet/3.0.B_DL0/sys/hp_pa_hpux/lib:/usr/local/X11R5/lib
You might need to add the following line to your .cshrc if you get a "SHLIB_PATH undefined" error.
setenv SHLIB_PATH /usr/local/X11R5/lib
- Enter op_newuser and answer the questions as indicated below.
-- MIL3 dir > /usr21/opnet
-- Include all models > y
-- Default OPNET product for this user account > 2
[for OPNET Modeler/Radio]
-- font configuration > 3
[for HP 9000/7xx Display, HP VUE Environment]
-- display name > [simply hit enter here]
- If you want to use HPs only, then skip down to 1.3, otherwise continue to the next line.
- If you want the flexibility to use either the HP or Sun architecture, then you must add the following line to your env_db3.0 file. You will need to run op_newuser only once.
arch_suffix: TRUE
- This added flexibility also restricts you to using either "ash" or "sheep."
- Finally, you should go to the systems administrators to get write permission to the OPNET models sub-directory. Also, request to be added to the OPNET group.
• 1.3 Invoking OPNET.
- Invoke OPNET's graphical interface by typing opnet at the command line UNIX prompt.
- For information about the non-graphical command line oriented method, see the External Interfaces Manual.
- By the way, you don't have to be logged into "ash" or "sheep" at the console in order to run OPNET. You can run OPNET remotely by typing the following. (The statements below assume you are connecting to ash instead of sheep.)
xhost +
telnet ash
Finally, you should set your environment display variable by typing:
setenv DISPLAY local_machine:0.0
where local_machine is the name of the machine in front of which you sit.
- Invoke OPNET's graphical interface by typing opnet at the command line UNIX prompt.
- For information about the non-graphical command line oriented method, see the External Interfaces Manual.
- By the way, you don't have to be logged into "ash" or "sheep" at the console in order to run OPNET. You can run OPNET remotely by typing the following. (The statements below assume you are connecting to ash instead of sheep.)
xhost +
telnet ash
Finally, you should set your environment display variable by typing:
setenv DISPLAY local_machine:0.0
where local_machine is the name of the machine in front of which you sit.
• 2.0 What is our MIL 3 Group ID?
Our MIL 3 Group ID is 9720. It should be included in correspondence to technical support.
Our MIL 3 Group ID is 9720. It should be included in correspondence to technical support.
• 3.0 What is the MIL 3 MUC?
MIL 3 has a Maintained User Community (MUC) on the WWW for OPNET. The MUC contains 3.1 problem logs and 3.2 instructions on how to subscribe to various mailing lists moderated by MIL 3. Instructions for accessing the MUC are given in 3.3 below.
MIL 3 has a Maintained User Community (MUC) on the WWW for OPNET. The MUC contains 3.1 problem logs and 3.2 instructions on how to subscribe to various mailing lists moderated by MIL 3. Instructions for accessing the MUC are given in 3.3 below.
• 3.1 Product Logged Problem Reports
Product Logged Problem entries are used to track the investigation and resolution of reports of problems or bugs with released OPNET software.
Product Logged Problem entries are used to track the investigation and resolution of reports of problems or bugs with released OPNET software.
• 3.2 Mailing lists (Moderated by Mil3)
JOB-LINK (Resumes of persons with OPNET experience)
MIL3-ANNOUNCE_ADS (MIL 3 news/announcements)
OPNET-FEEDBACK (OPNET product feedback - sugs/comments)
OPNET-MDL-802.14 (OPNET Model forum - 802.14 Cable)
OPNET-MDL-ATM (OPNET Model forum - ATM)
OPNET-MDL-AVAILABLE (OPNET Models Sought/Offered)
OPNET-MDL-BR_RTE (OPNET Model forum - Bridge/Routers)
OPNET-MDL-MAC (OPNET Model forum - MAC protocols)
OPNET-MDL-MISC (OPNET Model forum - other models)
OPNET-MDL-RADIO (OPNET Model forum - Radio)
OPNET-MDL-TCP_IP (OPNET Model forum - TCP/IP)
OPNET-PLP-STANDARD (OPNET Product Logged Problems - standard)
OPNET-PLP-URGENT (OPNET Product Logged Problems - urgent)
OPNET-TECH_QUESTIONS (OPNET Technical Questions)
OPUSER-ANNOUNCE_ADS (OPNET User Announcements and ads)
Subscrīption is via forms on the website or listproc commands sent by email. There are also list archives that appear to be searchable. Mil3 strongly suggests that OPNET users subscribe, at least, to the following lists:
MIL3-ANNOUNCE_ADS: MIL 3 news and announcements
OPNET-PLP-URGENT: Notification of urgent Product Logged Problems
JOB-LINK (Resumes of persons with OPNET experience)
MIL3-ANNOUNCE_ADS (MIL 3 news/announcements)
OPNET-FEEDBACK (OPNET product feedback - sugs/comments)
OPNET-MDL-802.14 (OPNET Model forum - 802.14 Cable)
OPNET-MDL-ATM (OPNET Model forum - ATM)
OPNET-MDL-AVAILABLE (OPNET Models Sought/Offered)
OPNET-MDL-BR_RTE (OPNET Model forum - Bridge/Routers)
OPNET-MDL-MAC (OPNET Model forum - MAC protocols)
OPNET-MDL-MISC (OPNET Model forum - other models)
OPNET-MDL-RADIO (OPNET Model forum - Radio)
OPNET-MDL-TCP_IP (OPNET Model forum - TCP/IP)
OPNET-PLP-STANDARD (OPNET Product Logged Problems - standard)
OPNET-PLP-URGENT (OPNET Product Logged Problems - urgent)
OPNET-TECH_QUESTIONS (OPNET Technical Questions)
OPUSER-ANNOUNCE_ADS (OPNET User Announcements and ads)
Subscrīption is via forms on the website or listproc commands sent by email. There are also list archives that appear to be searchable. Mil3 strongly suggests that OPNET users subscribe, at least, to the following lists:
MIL3-ANNOUNCE_ADS: MIL 3 news and announcements
OPNET-PLP-URGENT: Notification of urgent Product Logged Problems
• 3.3 Accessing the MUC
To access the MUC, you must be a Va Tech student.
Contact Dr. Nathaniel Davis IV at: ndavis@vt.edu for instructions.
To access the MUC, you must be a Va Tech student.
Contact Dr. Nathaniel Davis IV at: ndavis@vt.edu for instructions.
• 4.1 Local subdirectory
change directory to the contrib subdirectory by executing the following command.
cd /usr21/opnet/3.0.B_DL0/models/contrib
change directory to the contrib subdirectory by executing the following command.
cd /usr21/opnet/3.0.B_DL0/models/contrib
• 4.2 FTP site -- go here to find models that might have been added since the current OPNET release.
To access the FTP site, you must be a Va Tech student.
Contact Dr. Nathaniel Davis IV at: ndavis@vt.edu for instructions.
For an overview, read the file: CONTRIB_MODEL_SUMMARIES
To access the FTP site, you must be a Va Tech student.
Contact Dr. Nathaniel Davis IV at: ndavis@vt.edu for instructions.
For an overview, read the file: CONTRIB_MODEL_SUMMARIES
• 5.0 Is there a listing of the OPNET functions/procedures?
Yes, descrīptions are in the two-part Simulation Kernel Manual.
Yes, descrīptions are in the two-part Simulation Kernel Manual.
• 6.0 In the online documentation, how do I know what's hyper-text (i.e. clickable) and what's not?
You must explore and discover! (As one moves the cursor over hyper-text, it does NOT change from a pointer to a hand, as one would expect.)
You must explore and discover! (As one moves the cursor over hyper-text, it does NOT change from a pointer to a hand, as one would expect.)
• 7.0 Is the online index "searchable?"
The documentation does not have search capability built in. An alternative (but less effective) approach is to use the "find" feature built into the viewer.
The documentation does not have search capability built in. An alternative (but less effective) approach is to use the "find" feature built into the viewer.
• [Quoted from the Tool Operations Manual.]
"Source code that represents the model currently present in the active tool. Ema code is in text format, allowing you to edit it with an ordinary text editor. For more info about Ema, see the External Model Access chapter of the OPNET External Interfaces Manual. CAUTION: Ema source code files for all models have the same suffix, ".em.c", regardless of model type. Be sure that the Ema file you create will not overwrite a previously-created file you want to keep."
"Source code that represents the model currently present in the active tool. Ema code is in text format, allowing you to edit it with an ordinary text editor. For more info about Ema, see the External Model Access chapter of the OPNET External Interfaces Manual. CAUTION: Ema source code files for all models have the same suffix, ".em.c", regardless of model type. Be sure that the Ema file you create will not overwrite a previously-created file you want to keep."
• [Quoted
from the External Interfaces Manual, chapter Ema.] "External model
access is an OPNET term that is defined as follows: The technique of
accessing a model external to the opnet program (i.e., without using the
services provided by the opnet graphical editors). In this context, the
definition of accessing a model includes creating it, modifying it, and
extracting data from it. [Ema] is supported via a library of C-callable
functions, which serves as a programmatic specification and query
language. This library is nammed the [Ema] package, and it can viewed as
an Application Program Interface (API) for [manipulating] OPNET model
files."
• 9.0 Are there different simulation modes available?
Yes. Either 2 or 3, depending upon how you look at it. [Will elaborate on later...]
Yes. Either 2 or 3, depending upon how you look at it. [Will elaborate on later...]
• 10.0 So, what does the "rehash" button rehash?
The rehash button alphabetically sorts the model list. The model type depends on
The rehash button alphabetically sorts the model list. The model type depends on
• 11.0 Where is the trouble shooting chapter and what problems does it address?
Yes. It is last chapter in the Tutorial Manual (Vol.1). It addresses the following problems.
Compiling a Process Model
- Process Editor can't compile a model.
Checking Link Consistency
- Red "X" marks denote link inconsistencies.
Executing a Simulation
- op_runsum cannot construct the simulation repository.
- An executing simulation eventually freezes, displaying a fixed message in the Simulation Tool Message Display, and it makes no further progress.
- The simulation stops unexpectedly and prints one of the following error messages:
program abort -- bus error
program abort -- floating point exception
program abort -- segmentation violation
- When running a simulation model, the simulation halts and the following error message is issued: "Program Abort: no true transitions from state "
- When running a simulation model, the simulation halts and the following error message is issued: "Program Abort: multiple true transitions from state "
Specific Tool Operations
- Subnets, nodes, or modules within the Probe Editor do not appear in the attribute menu of the probe being edited when they are clicked on. - The selection of the destination module of a packet stream within the Node Editor fails and prints the error "Invalid Intermediate point. Path definition cancelled." - Activating action buttons fails and generates the error "point not in workspace."
- Writing a model file fails and prints the error "Unable to write model because it was opend read-only. Try a different name."
- During interactive use of OPNET, the cursor disappears or stays in the "hourglass" mode for a long time (several minutes). A simulation is not being executed, and the workstation or network does not seem to be excessively loaded (as evidenced by the ability to open up windows via the window system menus).
Yes. It is last chapter in the Tutorial Manual (Vol.1). It addresses the following problems.
Compiling a Process Model
- Process Editor can't compile a model.
Checking Link Consistency
- Red "X" marks denote link inconsistencies.
Executing a Simulation
- op_runsum cannot construct the simulation repository.
- An executing simulation eventually freezes, displaying a fixed message in the Simulation Tool Message Display, and it makes no further progress.
- The simulation stops unexpectedly and prints one of the following error messages:
program abort -- bus error
program abort -- floating point exception
program abort -- segmentation violation
- When running a simulation model, the simulation halts and the following error message is issued: "Program Abort: no true transitions from state "
- When running a simulation model, the simulation halts and the following error message is issued: "Program Abort: multiple true transitions from state "
Specific Tool Operations
- Subnets, nodes, or modules within the Probe Editor do not appear in the attribute menu of the probe being edited when they are clicked on. - The selection of the destination module of a packet stream within the Node Editor fails and prints the error "Invalid Intermediate point. Path definition cancelled." - Activating action buttons fails and generates the error "point not in workspace."
- Writing a model file fails and prints the error "Unable to write model because it was opend read-only. Try a different name."
- During interactive use of OPNET, the cursor disappears or stays in the "hourglass" mode for a long time (several minutes). A simulation is not being executed, and the workstation or network does not seem to be excessively loaded (as evidenced by the ability to open up windows via the window system menus).
• 12.0 Can I use a shell scrīpt to run a simulation?
Yes. Read the Simulation Execution chapter (specifically pages Simx-16 through Simx-18) in the OPNET External Interfaces Manual. The UNIX C shell scrīpt file given as an example is shown below.
#!/bin/csh
# frnet_sweq.csh: scrīpt to run frnet simulations
#S-method simulation runs
op_rumsim -net_name frnet -duration 10.0 -parm_A 50.0 -parm_B s_method
op_rumsim -net_name frnet -duration 10.0 -parm_A 100.0 -parm_B s_method
op_rumsim -net_name frnet -duration 10.0 -parm_A 150.0 -parm_B s_method
#T-method simulation runs
op_rumsim -net_name frnet -duration 10.0 -parm_A 50.0 -parm_B t_method
op_rumsim -net_name frnet -duration 10.0 -parm_A 100.0 -parm_B t_method
op_rumsim -net_name frnet -duration 10.0 -parm_A 150.0 -parm_B t_method
Important: remember to make the scrīpt file executable before attempting to run it. For the above example, one should type at the command line (UNIX prompt):
chmod +x frnet_seq.csh
Yes. Read the Simulation Execution chapter (specifically pages Simx-16 through Simx-18) in the OPNET External Interfaces Manual. The UNIX C shell scrīpt file given as an example is shown below.
#!/bin/csh
# frnet_sweq.csh: scrīpt to run frnet simulations
#S-method simulation runs
op_rumsim -net_name frnet -duration 10.0 -parm_A 50.0 -parm_B s_method
op_rumsim -net_name frnet -duration 10.0 -parm_A 100.0 -parm_B s_method
op_rumsim -net_name frnet -duration 10.0 -parm_A 150.0 -parm_B s_method
#T-method simulation runs
op_rumsim -net_name frnet -duration 10.0 -parm_A 50.0 -parm_B t_method
op_rumsim -net_name frnet -duration 10.0 -parm_A 100.0 -parm_B t_method
op_rumsim -net_name frnet -duration 10.0 -parm_A 150.0 -parm_B t_method
Important: remember to make the scrīpt file executable before attempting to run it. For the above example, one should type at the command line (UNIX prompt):
chmod +x frnet_seq.csh
• 13.0 What are the OPNET programs and scrīpts and where are they documented?
Listed below are the OPNET programs and scrīpts along with brief synopses. For more detailed descrīptions including general and program-specific attributes, see the Program Descrīptions chapter (Prog) of the External Interfaces Manual.
Listed below are the OPNET programs and scrīpts along with brief synopses. For more detailed descrīptions including general and program-specific attributes, see the Program Descrīptions chapter (Prog) of the External Interfaces Manual.
Program Name
|
Synopsis
|
m3_binin
|
Program that adds trace info to OPNET model code (not a stand-alone program).
|
m3_bintype
|
Utility to determine binary type of MIL3 programs in your path.
|
m3_clrtmp
|
Utility that removes all files from <$HOME>/op_admin/tmp (safer than rm *).
|
m3_comptype
|
Prints out a string describing host environment, including the computer manufacturer, CPU architecture, and operating system.
|
m3_cvanim
|
Utility that performs conversion between animation scrīpt and history files.
|
m3_edicon
|
Utility for creating or modifying icons used within M3UI-based programs.
|
m3_edkey
|
A graphical utility for defining M3UI logical keys in terms of specific key combinations.
|
m3_edmap
|
An M3UI-based, FLS-controlled application for creating or modifying maps in the Network Editor.
|
m3_flsd
|
Program that runs as a daemon process, issuing execution permits to FLS-controlled applications.
|
m3_flse
|
Program
that is executed as a background process by FLS-controlled
applications, releasing execution permits back to the FL Supervisor upon
exit of the applications.
|
m3_manfile
|
Utility
that performs management operations related to the tracking and
identification of OPNET model files, including file location, locks,
security protection/registration, and header contents.
|
m3_manfls
|
Utility that performs management operations for the FLS.
|
m3_mkema
|
Utility that compiles and links an application program that invokes functions from the Ema library.
|
m3_mkorg,(Radio only)
|
Utility that generates an orbit coordinate dataset for a satellite node, based on a specified set of orbital elements.
|
m3_prtext
|
Utility
that formats an ASCII text file into a Postscrīpt print output file,
spools the resulting file to a Postscrīpt output device.
|
m3_vanim
|
An M3UI-based, FLS-controlled application for viewing animation flows from an executing simulation or an animation history file.
|
m3_vuerr
|
Utility
that prints out function stack traceback and other program error
information. The error information is extracted from an error log
maintained by programs supplied by MIL 3 or based on MIL 3 object code
libraries.
|
m3_vuorb,(Radio only)
|
An M3UI-based, FLS-controlled application for viewing satellite orbits in 3-D projections.
|
opnet
|
An
M3UI-based, FLS-controlled application for editing and viewing OPNET
models, executing simulations, and analyzing simulation output results.
|
op_cvmod
|
Utility for converting an OPNET Release 2.5 model into a Release 3.0 model.
|
op_cvos
|
Utility
that converts the contents of a scalar ouput file (file type suffix
".os") into a user-editable ASCII text file as well as the reverse
conversion.
|
op_install
|
Provides a method for automating the OPNET installation procedure.
|
op_mko
|
Utility
that translates a process model into C code form, and compiles it into
object code form. This utility also compiles pipeline stages and
external code files.
|
op_mksim
|
Utility
that binds a simulation together from its components: the simulation
object code file, the associated model archive, and the simulation
kernel libraries.
|
op_newuser
|
Prepares a user account's home directory (<$HOME>) for OPNET use.
|
op_prmodel
|
Utility program to display useful summary information about a node or link model.
|
op_runsim
|
Program to run OPNET simulations.
|
op_techsup
|
Utility
scrīpt that displays useful info about MIL 3 Technical Support, and
allows you to print out various technical support forms.
|
• 14.0 I am ready to begin designing at the process model level, where should I start?
Below is a summary of the first 15 pages of the 120 page Process Domain Definitions (Prdef) Chapter (Modeling Manual, Volume 1).
Queues and processors (hence forth referred to as QP) offer essentially the same capabilities with regard to their general behavīor and most of their physical resources. However, queue modules provide special support for organized packet storage by allowing users to define internal subqueues in which packets can be inserted and sorted, and from which packets can be extracted according to a general, user-defined method.
A process is an instance of a process model defined with the Process Editor.
...processes are driven by events. When an event is actually delivered to a process, it is termed an interrupt, ... the process is said to be interrupted which means that it is invoked to allow it to take some action in response to the interrupt.
A process follows an alternation cycle of invocation and rest periods.
A process always begins the simulation in a resting mode, waiting to be invoked; a process that is waiting in this condition is said to be blocked.
At the moment when a simulation begins, each QP hosts only one process that is automatically created by the Simulation Kernel. This process, termed the root process, is an instance of the process model designated in the QP's "process model" attribute.
Can use root process as the only process, but it will be complex, therefore consider multiple processes. The latter approach also improves modularity.
Processes within a QP module create new processes to be associated with the QP module by calling the Kernel Procedure (KP) op_pro_create().
Root processes are created by the Kernel and dynamic processes are created by other processes.
Parent processes CAN be destroyed BEFORE their child processes.
Note that a process is capable of creating child processes of any type (i.e., based on any process model), including its own or the type of its parents; however, a complete list of child process models that it intends to instantiate must be declared prior to simulation.
Shared Memory Architecture (Communications mechanisms)
1. QP-level Shared Memory (also called module memory)
...it is up to the processes within the QP to decide how much memory is necessary and when it should become available. The processes are therefore responsible for allocating the block of shared memory.
Relevant KP's:
op_prg_mem_alloc() - performs memory allocation
op_pro_modmem_install() - sets shared memory area's address
op_pro_modmem_access() - gets shared memory area's address
In practice, a shared memory block is usually (but not necessarily) installed only once and this installation is performed by the root process when it is invoked for the first time.
2. Parent-to-child Shared Memory
The Kernel maintains an independent shared memory block for each parent-child pair in the system.
-Unlike QP-level shared memory, however, parent-to-child memory may only be installed once for each parent-child pair, when the child process is created with the KP op_pro_create().
-A process may obtain the address of the memory that it shares with its parent process by calling the KP op_pro_parmem_access().
3. Argument Memory
Communication between processes is often required at a time that one process transfers control to another by invoking it with the KP op_pro_invoke(). To support this type of information passing, op_pro_invoke() accepts a general memory address as an argument and makes this address available to the invoked process.
Operations on Dynamic Processes
When a process model is created, it is implicitly incorporated into the process hierarchy of the process that created it. There is no way to create a process in another QP than that of the current process.
process handle - the special data item returned by op_pro_create()
- variable declared by the data type Prohandle
- uniquely identifies a process, not only within a process
hierarchy, but within the entire modeled system (i.e. across all QP's)
- can also be obtained via op_pro_self(), op_pro_parent(), or op_pro_root()
Two other forms of process identification are provided, but neither is necessary to use the KP's that affect processes.
1. Process ID - can be obtained via op_pro_id()
- cannot recur within same simulation (i.e. are unique)
- used to represent processes' information output from the OPNET debugger (ODB)
2. Process tag - user-supplied string that can be assigned to a process at any time
- used only to identify processes or report special information about them as part of the output of the ODB command promap.
op_pro_destroy() - any dynamic process can be destroyed
- can be applied to other dynamic process or by a dynamic process to itself.
Regardless of the method by which a dynamic process is destroyed, the Simulation Kernel always provides it with an opportunity to perform a sequence of final actions via a special section of the process model called the Termination Block.
Characteristics of the TB:
- typically contains statements that deallocate dynamically allocated memory that is referenced within the process state variables.
- can be used to record final values of collected statistics
- can be used to notify other processes that may be affected by its destruction
- should not contain any function definitions.
- should not contain any variable declarations.
op_pro_invoke() - supports process-to-process invocation, i.e. allows one process that currently controls the thread of execution to cause another process to temporarily take control.
- process invocation does not support recursion; i.e. a process that is suspended due to having called op_pro_invoke() may not itself be invoked again until it has resumed control of the thread of execution and subsequently blocked.
- limitation on recursion applies only to process instances and NOT to process models, i.e. it is possible for distinct instances of the same process model to invoke each other.
Parent Process vs Invoking process
- a process' parent process is the one that created it and therefore a process can have only one parent (root has no parent).
- each process, including the root, may be invoked by any other process in the same process hierarchy, and different processes may even invoke it during the same event.
Interrupt Steering
When an interrupt occurs for a QP, the Simulation Kernel must make a decision concerning which process will first be invoked to handle the interrupt. The most general way to manage situations where interrupts must receive initial handling by different processes, is to create a dispatcher process that decides which process to invoke. Most often, the dispatcher process is the root process since it receives interrupts by default.
Instead of using a dispatcher process, can use two KP's that request that the Kernel automatically invoke a particular process based on the type of interrupt or based on the input on which an interrupt arrives. op_intrpt_type_register() - supports steering based on interrupt type (excluding interrupts of type self, process, and procedure).
op_intrpt_port_register() - provides additional specificity regarding the input stream or input statistic associated with the interrupt.
If both mechanisms are used, port registration has precedence over type registration.
Local Process Resources
The QP object provides the processes that it contains with certain resources that are implicitly part of each process' environment.
I/O Streams
- Packet Streams are objects that exist in the Node Editor and are used to connect modules together.
Input streams accept packets from two sources:
1. packet stream objects.
2. remote delivery service provided by op_pk_deliver() and related KP's.
op_intrpt_strm() - may be called by a process to determine which input stream received the new packet.
op_pk_get() - called by a process to obtain the earliest arriving packet that remains in an input stream of its QP (must reference appropriate input stream index).
op_strm_pksize() - returns number of packets remaining in the input stream.
Output streams support communication of packets via the KP's op_pk_send(), op_pk_send_delayed(), op_pk_send_forced(), and op_pk_send_quiet().
Output and input streams may also be referenced by the stream accessing mechanism.
Below is a summary of the first 15 pages of the 120 page Process Domain Definitions (Prdef) Chapter (Modeling Manual, Volume 1).
Queues and processors (hence forth referred to as QP) offer essentially the same capabilities with regard to their general behavīor and most of their physical resources. However, queue modules provide special support for organized packet storage by allowing users to define internal subqueues in which packets can be inserted and sorted, and from which packets can be extracted according to a general, user-defined method.
A process is an instance of a process model defined with the Process Editor.
...processes are driven by events. When an event is actually delivered to a process, it is termed an interrupt, ... the process is said to be interrupted which means that it is invoked to allow it to take some action in response to the interrupt.
A process follows an alternation cycle of invocation and rest periods.
A process always begins the simulation in a resting mode, waiting to be invoked; a process that is waiting in this condition is said to be blocked.
At the moment when a simulation begins, each QP hosts only one process that is automatically created by the Simulation Kernel. This process, termed the root process, is an instance of the process model designated in the QP's "process model" attribute.
Can use root process as the only process, but it will be complex, therefore consider multiple processes. The latter approach also improves modularity.
Processes within a QP module create new processes to be associated with the QP module by calling the Kernel Procedure (KP) op_pro_create().
Root processes are created by the Kernel and dynamic processes are created by other processes.
Parent processes CAN be destroyed BEFORE their child processes.
Note that a process is capable of creating child processes of any type (i.e., based on any process model), including its own or the type of its parents; however, a complete list of child process models that it intends to instantiate must be declared prior to simulation.
Shared Memory Architecture (Communications mechanisms)
1. QP-level Shared Memory (also called module memory)
...it is up to the processes within the QP to decide how much memory is necessary and when it should become available. The processes are therefore responsible for allocating the block of shared memory.
Relevant KP's:
op_prg_mem_alloc() - performs memory allocation
op_pro_modmem_install() - sets shared memory area's address
op_pro_modmem_access() - gets shared memory area's address
In practice, a shared memory block is usually (but not necessarily) installed only once and this installation is performed by the root process when it is invoked for the first time.
2. Parent-to-child Shared Memory
The Kernel maintains an independent shared memory block for each parent-child pair in the system.
-Unlike QP-level shared memory, however, parent-to-child memory may only be installed once for each parent-child pair, when the child process is created with the KP op_pro_create().
-A process may obtain the address of the memory that it shares with its parent process by calling the KP op_pro_parmem_access().
3. Argument Memory
Communication between processes is often required at a time that one process transfers control to another by invoking it with the KP op_pro_invoke(). To support this type of information passing, op_pro_invoke() accepts a general memory address as an argument and makes this address available to the invoked process.
Operations on Dynamic Processes
When a process model is created, it is implicitly incorporated into the process hierarchy of the process that created it. There is no way to create a process in another QP than that of the current process.
process handle - the special data item returned by op_pro_create()
- variable declared by the data type Prohandle
- uniquely identifies a process, not only within a process
hierarchy, but within the entire modeled system (i.e. across all QP's)
- can also be obtained via op_pro_self(), op_pro_parent(), or op_pro_root()
Two other forms of process identification are provided, but neither is necessary to use the KP's that affect processes.
1. Process ID - can be obtained via op_pro_id()
- cannot recur within same simulation (i.e. are unique)
- used to represent processes' information output from the OPNET debugger (ODB)
2. Process tag - user-supplied string that can be assigned to a process at any time
- used only to identify processes or report special information about them as part of the output of the ODB command promap.
op_pro_destroy() - any dynamic process can be destroyed
- can be applied to other dynamic process or by a dynamic process to itself.
Regardless of the method by which a dynamic process is destroyed, the Simulation Kernel always provides it with an opportunity to perform a sequence of final actions via a special section of the process model called the Termination Block.
Characteristics of the TB:
- typically contains statements that deallocate dynamically allocated memory that is referenced within the process state variables.
- can be used to record final values of collected statistics
- can be used to notify other processes that may be affected by its destruction
- should not contain any function definitions.
- should not contain any variable declarations.
op_pro_invoke() - supports process-to-process invocation, i.e. allows one process that currently controls the thread of execution to cause another process to temporarily take control.
- process invocation does not support recursion; i.e. a process that is suspended due to having called op_pro_invoke() may not itself be invoked again until it has resumed control of the thread of execution and subsequently blocked.
- limitation on recursion applies only to process instances and NOT to process models, i.e. it is possible for distinct instances of the same process model to invoke each other.
Parent Process vs Invoking process
- a process' parent process is the one that created it and therefore a process can have only one parent (root has no parent).
- each process, including the root, may be invoked by any other process in the same process hierarchy, and different processes may even invoke it during the same event.
Interrupt Steering
When an interrupt occurs for a QP, the Simulation Kernel must make a decision concerning which process will first be invoked to handle the interrupt. The most general way to manage situations where interrupts must receive initial handling by different processes, is to create a dispatcher process that decides which process to invoke. Most often, the dispatcher process is the root process since it receives interrupts by default.
Instead of using a dispatcher process, can use two KP's that request that the Kernel automatically invoke a particular process based on the type of interrupt or based on the input on which an interrupt arrives. op_intrpt_type_register() - supports steering based on interrupt type (excluding interrupts of type self, process, and procedure).
op_intrpt_port_register() - provides additional specificity regarding the input stream or input statistic associated with the interrupt.
If both mechanisms are used, port registration has precedence over type registration.
Local Process Resources
The QP object provides the processes that it contains with certain resources that are implicitly part of each process' environment.
I/O Streams
- Packet Streams are objects that exist in the Node Editor and are used to connect modules together.
Input streams accept packets from two sources:
1. packet stream objects.
2. remote delivery service provided by op_pk_deliver() and related KP's.
op_intrpt_strm() - may be called by a process to determine which input stream received the new packet.
op_pk_get() - called by a process to obtain the earliest arriving packet that remains in an input stream of its QP (must reference appropriate input stream index).
op_strm_pksize() - returns number of packets remaining in the input stream.
Output streams support communication of packets via the KP's op_pk_send(), op_pk_send_delayed(), op_pk_send_forced(), and op_pk_send_quiet().
Output and input streams may also be referenced by the stream accessing mechanism.
- Examine the trouble-shooting chapter (Chapter Tsh of the Tutorial Manual).
- Use the opnet debugger. The debugger is extensive, but here are some hints.
- If you're using the command line mode of the debugger (instead of the M3UI), type "help" for a command summary.
- Other good commands are: objmap all, objid, tstop, cont, objprint or attrget, hist, and quit
- To learn more about running the OPNET Debugger (ODB), read through Simx-22 to Simx-140 of the External Interfaces Manual. - Use the Diagnostic Block - My understanding is that code that is contained in this block is only executed when the debugger is enabled. (You should verify this...)
- Use the m3_vuerr command to see the function stack. The stack "builds downward" so the function which was executed last, will appear at the bottom. In order for procedures that you create to appear, you must include FIN, FRET, and FOUT statements.
- 16.0 What's the difference between State Variables and Temporary Variables?
According to page Bpt-15 of the Tutorial manual:
"State variables are persistent and private. That is, they retain their value between invocations of the process model and are maintained independently for each process in the system. Temporary variables retain their values only until control is returned to the Simulation Kernel when the FSM rests in an unforced state."
Subscribe to:
Posts (Atom)